iOptron CEM60
Example frames: M81 and M82
This is the equipment and software stack behind the images — collected slowly over years of learning, field nights, upgrades, and the occasional hard-earned lesson.
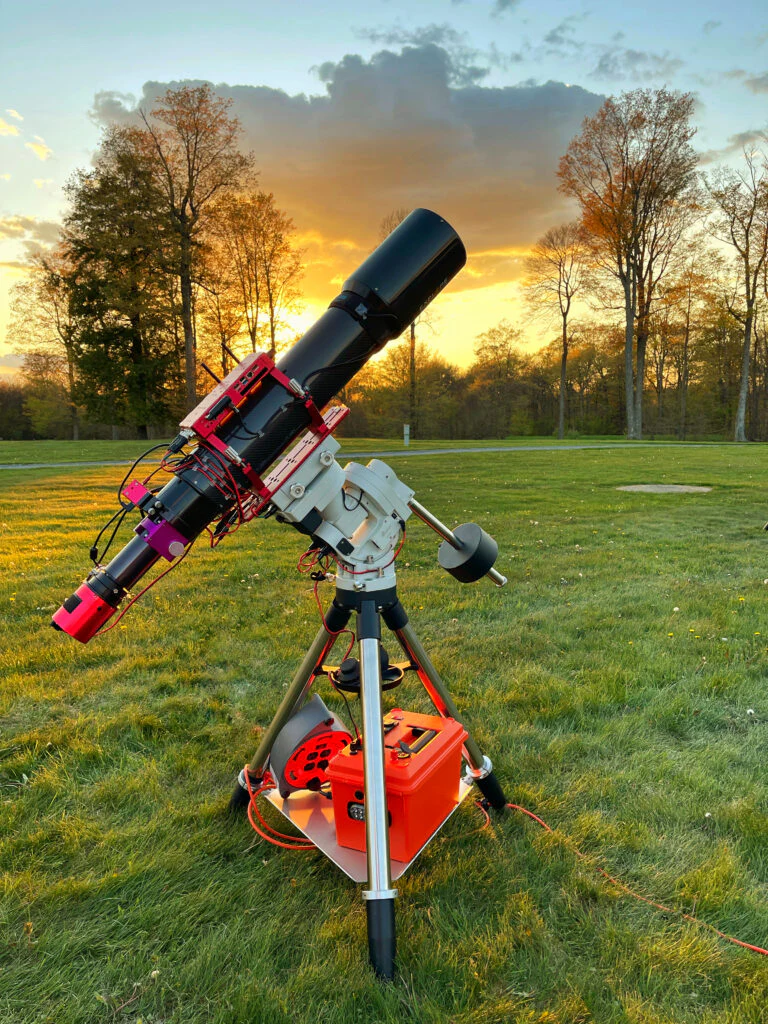
Gear questions are the ones I hear most — from friends who know nothing about the hobby and from club members who want every detail. This page is the honest answer.
I did not buy all of this at once. The list has grown over more than a decade and still changes. Current equipment is marked clearly; retired and former pieces stay here because they are part of how I learned.
Current rig at a glance
A quick snapshot of the active imaging train. Scroll down for the full history, older gear, and software workflow.
iOptron CEM60
Example frames: M81 and M82
Explore Scientific FCD100 127mm Carbon Fiber Triplet APO
Example frames: Andromeda Galaxy
ZWO ASI2600MM Pro
Example frames: Horsehead Nebula , California Nebula
Chroma 36mm Ha, OIII, SII, and LRGB (ZWO EFW 7×36mm)
Example frames: Soul Nebula
MoonLite NiteCrawler
Example frames: Wizard Nebula
Starizona Apex ED 0.65×
Example frames: Andromeda Galaxy
ZWO off-axis guider + ASI290MM Mini
Example frames: M81 and M82
PrimaLuceLab Eagle 4S, Powerwerx PSU, Bioenno field battery, and MEGAbox
Example frames: California Nebula
Three eras, three different problems to solve. Each step taught something the next build depended on.
Orion Atlas mount, ED127 Essential refractor, and the ASI071MC one-shot-color era.
Lesson learned: A modest setup can still teach polar alignment, guiding, and processing — but a shaky mount will fight you on every sub.
CEM60, FCD100 refractor, and the transition toward longer integrations and better optics.
Lesson learned: Better tracking and sharper optics buy you time: fewer ruined frames and more confidence to stretch acquisition.
ASI2600MM Pro, Chroma narrowband and LRGB filters, MoonLite NiteCrawler, and Eagle 4S field control.
Lesson learned: Mono narrowband and automation pay off only after power, cabling, and guiding are boringly reliable.
The gear list is only half the story. These are the practical lessons that actually changed how I run a night.
Tracking quality shows up in every frame. A better mount often improves results more than a bigger telescope.
Snags, loose USB runs, and dew-soaked connectors end sessions quietly. Label cables and strain-relief early.
Voltage drops and loose DC connections cause random failures that look like software bugs until you fix the wiring.
Filters, focus shifts, and longer total integration time reward patience. OSC cameras are still a great way to learn.
Sequences are wonderful after polar alignment, balance, guiding, and power are already boringly repeatable.
No — and I did not start here. This setup was built slowly across many seasons, upgrades, and mistakes.
A starter kit can be a sturdy mount, a modest telescope or lens, a cooled or uncooled camera, and free or inexpensive software. You can produce satisfying images long before narrowband filters, a rotator, or a field computer.
Treat this page as a trail map, not a shopping list. Buy for the problems you actually have after you have spent time under the stars.
Current pieces sit beside older equipment that helped build the system. Badges mark what is in use today versus what has been retired.
Product links are for identification and reference only. They are not endorsements, and your best choices depend on your budget, site, and goals.
The mount holds the telescope steady and tracks the sky so stars stay round during long exposures.
The main optical tube collects light and defines the field of view and image scale.
The camera records photons as digital data. Mono sensors use filters to build color or narrowband images.
Guiding watches a guide star and makes tiny corrections so the mount tracks accurately for minutes at a time.
Filters isolate specific wavelengths — narrowband for nebulae, LRGB for true-color work — and sit in a motorized wheel.
A reducer/flattener widens the field and keeps stars sharp to the corners of the sensor.
Stable 12V power and a field hub keep mounts, dew heaters, and the acquisition computer running through the night.
A precision focuser keeps stars pin-sharp; a rotator can square the camera to the sky for framing.
The computer at the telescope runs capture software, device drivers, and sequencing all night.
A separate workstation stacks, calibrates, and polishes raw frames into the finished images on the site.
Hardware is only half the stack. These tools plan the night, run capture at the telescope, and turn raw data into finished images at home.
Choosing targets, framing, and knowing what will be up when you travel to a dark site.
Running the mount, camera, filter wheel, and sequence through one interface at the telescope.
Locking onto a guide star and sending small corrections to the mount during exposure.
Matching star patterns so the mount knows exactly where it is pointing — essential for unattended imaging.
Turning stacks of raw frames into the final color or narrowband images you see in the gallery.
Moving data between field and home machines and keeping remote access simple.